


How to install your Artificial Vertical Garden
So you've ordered your Vertical Garden, or thinking about making the change to Artificial Wall Garden's but you're still unsure about how to install them onto your fence or wall.
The DVG team have developed a handy How to Install Guide to assist you in installing your panels in the easiest way to ensure you can spend more time looking at your garden oasis!
If you have a special area/surface that isn't listed here - please get in touch with the team at sales@designerverticalgardens.com.au for advice on how to best install.

Timber/Plaster
Special tools required (don't forget safety gear):
- Staple Gun
- Staples
How to Install onto timber and plaster:
Holding your Vertical Garden Panel against the wall/surface you are attaching to, use the staple gun and align so that each prong of the staple is on either side of the grid backing (shown below).
Press firmly with the staple gun, and repeat where necessary.

Concrete/Brick/Render
Special tools required (don't forget safety gear):
- Hammer Drill
- Nylon Plugs
- Hammer
- Washers (if required)
How to Install onto concrete, brick or render:
Using a hammer drill (with the correct drill head) drill about 5 mm deep.
Then using a Nylon Plug, line up a corner of the grid on the back of the panel with the hole in the wall, and place the nylon plug in the hole. (The Nylon Plug will push the grid flush against the wall.
Using a hammer, hammer the head of the plug until the nail cannot be seen. The Vertical Garden Panel will then be held flush to the wall.
Add more plugs where required.
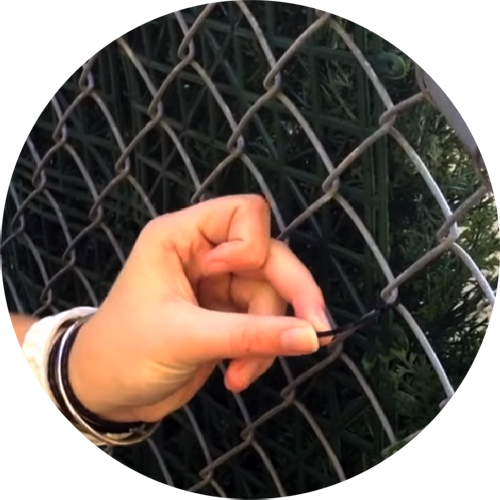
Cyclone or Vertical Bar Fencing
Special tools required (don't forget safety gear):
- Cable Ties (black if outdoors)
- Gloves
How to Install onto cyclone fencing or vertical bar fencing:
Using cable ties, simply push the cable tie around the grid of the panel, and around a vertical or horizontal bar of the fence - and pull tight.
Repeat where required.
Colourbond Fencing
Special tools required (don't forget safety gear):
- Drill
- Screws
- Staple Gun
- Staples
- Timber Batons or Fence Palings
How to Install onto Colourbond Fencing:
To attach the Vertical Garden Privacy Paneling to colourbond fencing - timber batons need to be attached to the fence before attaching the paneling.
Attach Vertical Timber batons about 30 cm apart (batons can be fence palings) to the Colourbond capping at the top and bottom of the fencing using screws. From there - you can follow the same installation method as attaching to timber using a staple gun.
This method will ensure that your colourbond fencing is not damaged, and screws will not protrude from the other side of the fence.